
The K5 SMTP relay service allows the sending of emails via the REST API for easy integration with your application, or directly via a SMTP server from a client that supports either STARTTLS or SSL/TLS. For a comparison between STARTTLS, SSL/TLS and SMTP protocols, please see https://www.fastmail.com/help/technical/ssltlsstarttls.html. See also the FJ IaaS Features Handbook for the latest on service constraints and limitations.
The K5 SMTP relay service utilises the Nifty SMTP service in Japan and requires you to authenticate against and obtain a security token from the K5 Japan East (jp-east-1) region. This will require you to enable the Japan-East-1 region for your contract, if not already enabled, and also create a project within this region, for which the account you are using in the scripts has full administrator permissions to.
You should ensure your scripts for obtaining a token (e.g. init.sh) refer to the following endpoints, and include the ID of the project in Japan region:
TOKEN=https://identity.jp-east-1.cloud.global.fujitsu.com
MAILSERVICE=https://mail.jp-east-1.cloud.global.fujitsu.com
NOTE: The mail service endpoints for other regions have been withdrawn and are no longer supported.
Using the API Service
Before you can use the K5 SMTP relay service , it is necessary to first identify the email address/domain you want to use and then validate/prove ownership of that email address/domain. This blog will provide a walk through of the process for both a single email address and full domain.
Sending an Email via the API from a Single Email Address
The following command can be used to start the ownership validation of a single email address (in the below example I am using my Fujitsu email address ian.purvis@uk.fujitsu.com).
This file contains bidirectional Unicode text that may be interpreted or compiled differently than what appears below. To review, open the file in an editor that reveals hidden Unicode characters.
Learn more about bidirectional Unicode characters
| curl $MAILSERVICE -X POST -H "Content-Type: application/x-www-form-urlencoded; charset=utf-8" -H "Accept: application/xml" -H "X-Auth-Token: $OS_AUTH_TOKEN" -d 'Action=VerifyEmailIdentity&EmailAddress=ian.purvis@uk.fujitsu.com' | xmllint –format – |
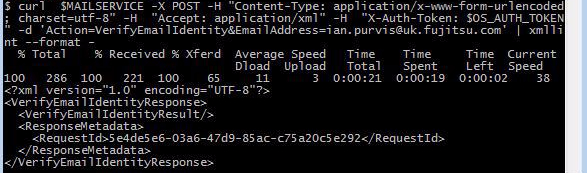
This will result in an email being automatically sent to the email address you specified. Scroll down this email, ignoring the Japanese text (unless you can speak Japanese) and click the link under ‘Verify registered email address’:

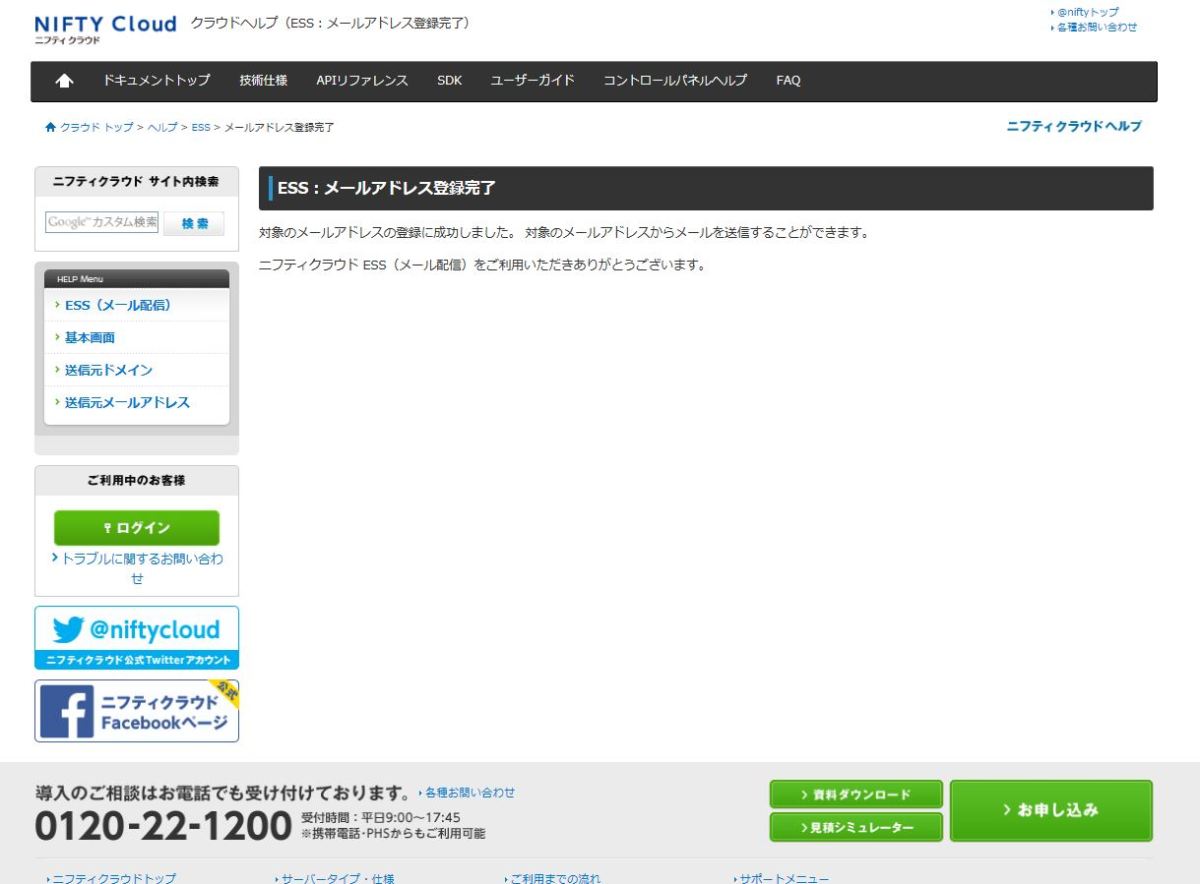
This link will take you to the Nifty Cloud Portal in Japan. If you can see a screen as below, then you have successfully validated your email address and the web page can be closed:
In the below command, I am using the validated ian.purvis@uk.fujitsu.com email address as my source address and ianpurvis1976@gmail.com as my target address:
This file contains bidirectional Unicode text that may be interpreted or compiled differently than what appears below. To review, open the file in an editor that reveals hidden Unicode characters.
Learn more about bidirectional Unicode characters
| curl $MAILSERVICE -X POST -H "Content-Type: application/x-www-form-urlencoded; charset=utf-8" -H "Accept: application/xml" -H "X-Auth-Token: $OS_AUTH_TOKEN" -d 'Action=SendEmail&Destination.ToAddresses.member.1=ianpurvis1976%40gmail.com&Message.Body.Text.Data=Test Email&Message.Subject.Data=This is a test message&Source=ian.purvis%40uk.fujitsu.com' |
This results in an email being relayed to my target mailbox, as if from my validated source email address:

Sending an Email via the API from any email address associated with your domain
The following command can be used to start the ownership validation of your domain name (in the below example I am using my Godaddy registered public facing domain ianpurvis.co.uk).
This file contains bidirectional Unicode text that may be interpreted or compiled differently than what appears below. To review, open the file in an editor that reveals hidden Unicode characters.
Learn more about bidirectional Unicode characters
| curl $MAILSERVICE -X POST -H "Content-Type: application/x-www-form-urlencoded; charset=utf-8" -H "Accept: application/xml" -H "X-Auth-Token: $OS_AUTH_TOKEN" -d 'Action=GetIdentityVerificationAttributes&Identities.member.1=ianpurvis.co.uk' | xmllint –format – |
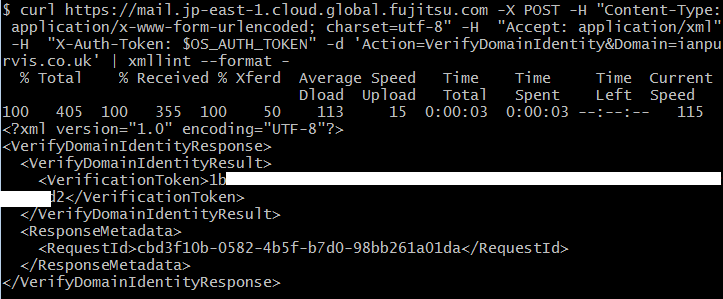
This results in a verification token that must be added as a TXT record to the DNS record for the Domain. For the purposes of this blog, I am using the K5 DNS as configured in my previous blog , and have redirected Godaddy to use the K5 Nameservers. (I did try and get this to work with the Godaddy DNS servers, but I was unable to add a TXT record with a Domain Name\Name in the required format, without it being truncated).
I used the following command to create a TXT record with my Domain Name Space for ianpurvis.co.uk. with a Name\Domain Name in the format “_niftycloudess.<DOMAINNAME>” and the verification token from above, in place of <INSERT YOUR TOKEN HERE>
This file contains bidirectional Unicode text that may be interpreted or compiled differently than what appears below. To review, open the file in an editor that reveals hidden Unicode characters.
Learn more about bidirectional Unicode characters
| curl $DNS/v1.0/hostedzone/ianpurvis.co.uk/rrset -X POST -H "Content-Type: application/xml" -H "Accept: application/xml" -H "X-Auth-Token: $OS_AUTH_TOKEN" -d '<?xml version="1.0" encoding="UTF-8"?><ChangeResourceRecordSetsRequest xmlns="http://docs.cloudcommunity.global.fujitsu.com/dns/api/v1.0/"><ChangeBatch><Changes><Change><Action>CREATE</Action><ResourceRecordSet><Name>_niftycloudess.ianpurvis.co.uk</Name><Type>TXT</Type><TTL>60</TTL><ResourceRecords><ResourceRecord><Value><INSERT YOUR TOKEN HERE></Value></ResourceRecord></ResourceRecords></ResourceRecordSet></Change></Changes></ChangeBatch></ChangeResourceRecordSetsRequest>' | xmllint –format – |

The following command can then be used to verify the domain validation is now successful.:
This file contains bidirectional Unicode text that may be interpreted or compiled differently than what appears below. To review, open the file in an editor that reveals hidden Unicode characters.
Learn more about bidirectional Unicode characters
| curl $MAILSERVICE -X POST -H "Content-Type: application/x-www-form-urlencoded; charset=utf-8" -H "Accept: application/xml" -H "X-Auth-Token: $OS_AUTH_TOKEN" -d 'Action=GetIdentityVerificationAttributes&Identities.member.1=ianpurvis.co.uk' | xmllint –format – |

The following command can now be used to send an email from any address in my validates domain (even if no actual mailbox exists):
This file contains bidirectional Unicode text that may be interpreted or compiled differently than what appears below. To review, open the file in an editor that reveals hidden Unicode characters.
Learn more about bidirectional Unicode characters
| curl $MAILSERVICE -X POST -H "Content-Type: application/x-www-form-urlencoded; charset=utf-8" -H "Accept: application/xml" -H "X-Auth-Token: $OS_AUTH_TOKEN" -d 'Action=SendEmail&Destination.ToAddresses.member.1=ianpurvis1976%40gmail.com&Message.Body.Text.Data=Test Email&Message.Subject.Data=This is a test message&Source=ian%40ianpurvis.co.uk' |
Notes, that %40 must be used instead of the “@” sign. In the above example, I have succesfully sent my ianpurvis1976@gmail.com and email from ian@ianpurvis.co.uk

SMTP Relay Service
Sending an Email via the SMTP Relay Service
In addition to the API, emails can also be sent directly via the Nifty SMTP relay service, using a supported client. Note this service requires the use of either STARTTLS or SSL/TLS protocols to ensure all emails are encrypted and does not support the sending of emails via standard SMTP.
1. To enable this service within your K5 domain, you must first create /request a SMTP username and password using the API:
This file contains bidirectional Unicode text that may be interpreted or compiled differently than what appears below. To review, open the file in an editor that reveals hidden Unicode characters.
Learn more about bidirectional Unicode characters
| curl $MAILSERVICE -X POST -H "Content-Type: application/x-www-form-urlencoded; charset=utf-8" -H "Accept: application/xml" -H "X-Auth-Token: $OS_AUTH_TOKEN" -d 'Action=CreateSMTPUser' |

2. The username and password assigned can be later obtained again using the following command. Note there is only one account per K5 project and neither the username or password can be amended:
This file contains bidirectional Unicode text that may be interpreted or compiled differently than what appears below. To review, open the file in an editor that reveals hidden Unicode characters.
Learn more about bidirectional Unicode characters
| curl $MAILSERVICE -X POST -H "Content-Type: application/x-www-form-urlencoded; charset=utf-8" -H "Accept: application/xml" -H "X-Auth-Token: $OS_AUTH_TOKEN" -d 'Action=GetSMTPUserInfo' |
3. The username and password can then be used in conjunction with the SMTP Service details below, to configure your support client:
SMTP client Server: ess-smtp.cloud.nifty.com
Port: TCP 587 (STARTTLS) or TCP 465 (SSL TLS)
4. For the purpose of validating the connection, you can use a email client such as Mozilla Thunderbird. As Thunderbird requires a valid email account for both sending and receiving emails, you must first configure the client to use an email address such as a Google Mail (GMAIL) email account. You can then edit the outgoing server details to specify the K5 details above, ensuring your Security Groups/Firewalls allow outgoing TCP587 or TCP465 (and DNS).
Within ‘Options | Account Settings’ click ‘Manage Identities | Edit ‘ and update your email address and other details to reference the email address previously verified.

Then select ‘Outgoing Server | Edit ‘ and update the SMTP server details.

And that is it!! When you first send an email, you will prompted for the SMTP user password. At this point you have the option to store the password, so that you do not have to re-enter it each time you send an email.
